Thursday, December 12, 2013

Barb's Best Ever Cheese Cake!


Barb's Best Ever Cheesecake

(recipe by http://twistedflavor.blogspot.com)

16 oz Cream Cheese
16 oz Mascarpone Cheese
1 1/2 Cup Sugar
4 eggs
1 Tbsp Vanilla

1 package of Graham Crackers
2 Tbsp Sugar
4 Tbsp Butter

Preheat oven to 350 degrees.  Smash package of Graham crackers.  Add sugar and melted Butter.  Combine and press into a 9" spring form pan.  Bake in the oven for 8 minutes. Remove from oven and cool for 10 minutes before adding the Cheese mixture.

It is important to have both cheese and eggs at room temperature. Separate the egg whites and yolks.  In a bowl beat egg whites until they are stiff peaks.  In a large bowl combine cream cheese and mascarpone.  Beat until fluffy.  Add egg yokes one at a time and then the sugar and vanilla.  Fold in the egg white to the cheese mixture a little at a time. Be careful to not deflate the whites. Once combined pour over graham cracker crust.  Bake at 350 in a water bath for 1 hour. When the time is up, leave the Cheesecake in the oven with the door open.  You may need to prop the door open with a wooden spoon.  Let it completely cool in the pan, in the oven.

While Mark and I were in Florida we ate at an Italian restaurant called "Pastability's".
I know cheesy right.  But, I loved it.  So anyways we were eating with his baseball team mates and they order Cheesecake.  I am not really a fan of Cheesecake, but everyone insisted that I try it.  It was divine!  It was the lightest creamiest cheesecake I have ever had.  So I set out to replicate this cheesecake for Mark.

I took Grandma's Cheesecake recipe and started working.  I began with just adding Mascarpone Cheese.  But I didn't achieve the texture I wanted until it beat the egg whites and folded them in and played with the sugar.  Eureka! I had created it.  I tried it out on some of my toughest critics, my husbands family and My sister Janis.  Everyone loved it.  In fact at Thanksgiving it was the first dessert completely gone. Can I just say I had baked  Blackberry, Apple, Pumpkin and Lemon pies.


I like to start by placing the Graham Crackers in a gallon Ziploc bag.  Use a rolling pin to smash the cracker.  if you roll it over the crackers it will smash without breaking the bag.  I throw the sugar and butter into the Ziploc bag and mix.  Pour into the 9" Spring form pan and bake at 350 for 8 minutes.


While the crust is cooling, Mix the Cheesecake batter.
It is important to have both cheese and eggs at room temperature. Separate the egg whites and yolks.    In a large bowl combine cream cheese and mascarpone.  Beat until fluffy.  Add egg yokes one at a time and then the sugar and vanilla.


In a Separate bowl beat egg whites until stiff peaks.  You will know you have stiff peaks when turning the beaters over the peaks will stand up.  Fold in the egg white to the cheese mixture a little at a time. Be careful to not deflate the whites.


 After the crust has cooled for 10 minutes pour the cheese mixture is over graham cracker crust.


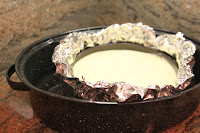
* get 2 sheets of alumni foil and wrap the bottom of the Spring form pan.  This will prevent the water from leaking.  In a roasting pan or large pan, Add enough water to go half way up the side of the spring form pan.


Bake at 350 in a water bath for 1 hour. When the time is up, leave the Cheesecake in the oven with the door open.  You may need to prop the door open with a wooden spoon.  Let it completely cool in the pan, in the oven.  


Enjoy!
Love Barbara

Wednesday, December 11, 2013

Hands Down BEST Rolls


Hands Down Best Roll
1/2 cup Water
1 Tbs Yeast
3/4 Cup (- 2tbs  sugar for yeast)
3 Eggs (slightly beaten)
1 tea Salt
2 Cups Milk
1 Cube butter
5 Cups flour
Add hot water to bowl. Add yeast and 2 tbs sugar. Let sit for 10 minutes to activate yeast. While that is sitting add milk and butter in a microwave safe bowl and cook about 2 1/2 minutes until butter is melted. Add remaining sugar to milk mixture. When cooled add to yeast. Add your eggs, salt and flour and mix for about 10 minutes. Let rise until doubled in size. Shape into desired shape and let rise again. Bake at 350 degrees for 13-15 minutes
 Print Recipe

----------------------------------------------------------------------------------------------------------------
Ok I have tried and tried to make rolls that I love. I've made really good rolls (and some terrible ones) but I haven't loved any of them. Don't get me wrong I'm not prejudice against homemade bread. I'll eat it if it's there, but I wanted to find something really worth the calories. This is hands down the best recipe I have found                           
Ok the one thing I hate about bread is I hate getting out a thermometer and making sure my water is the right temp. Call me lazy but that added step kills my mood... So what works for me is I turn my tap on as hot as it gets add my yeast and 2 TBS of sugar and call it a day. And my yeast activates so that's all I care about.                   
                  

In my glass measuring cup I add my milk and butter and stick it in the microwave for about 2 1/2 minutes or until the butter has melted. Then I add the sugar to try to cool the temperature down enough to add to the yeast. Also don't judge the amount of sugar. You wanted the best roll recipe that's why you're reading this. I didn't say it was healthy!!

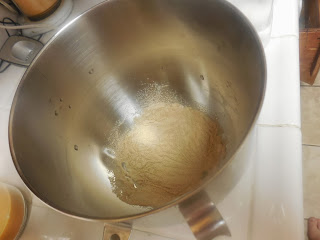
Once the mixture cools down I add my eggs and milk mixture to the yeast. Then I add my flour and let my kitchen aid mix for 10 minutes. Your dough should be a little sticky....as it turns out I don't speak geek so computer stuff...well there's a reason this picture below is off to the right and also wouldn't upload the rotated picture. Just cock your head to the side!!


The best my rolls have ever turned out is when I made the dough up the night before I wanted to use it and let it rise in the fridge over night. Then I rolled out my rolls in the morning and let them rise.
                                                 
This is the most ingenious part (I learned it from a lady in my church teaching a bread class...and no I am not Amish!!) Instead of adding more flour to your surface to roll out your dough spray non-stick spray to your counter, roller and hands. It's genius!!
                                                           

You can add butter before you roll up the dough. I roll my rolls out and cut them into rectangles. Then I start at one end and roll them up into a crescent like shape. Place them on the pan seam side down.
                                           

Let rise and bake at 350 for about 13-15 minutes
xoxo Janis!!

Monday, November 25, 2013

Make your own Vanilla!

How to make Vanilla


My In-Laws had taken all of their Married children and spouses to Tahiti after they sold their home.  We had a wonderful time.  When it came time to come home. One of my sister in laws had put Tahitian Vanilla Beans, 
that she had purchased in the open market,  
in her bra to smuggle them home! 
I wondered what in the world 
would make her do that......
She was making Vanilla.
I am not going to out her completely,  So
 She who will not be named 
taught me how to make Vanilla.  
I have been making it ever since.
 This makes a wonderful gift.  I find pretty bottles to put my vanilla in and everyone comes to my house for refills. I don't think any member of my family has bought any vanilla in years!

I order my Madagascar Vanilla Beans off the internet.  Love the internet for those things. There are several sights our there selling grade A vanilla beans.   Make sure they are fresh.  If they snap and break when you fold them.  They are too old to use.  They should be plump, slightly oily and 
smell like a little slice of heaven.
When I started this post I was still using Vodka that is 80 proof..  This year I tried Rum, also 80 proof.  I was told it makes a wonderful vanilla and 
They were right!
 Remove any strainer from the bottle.  Be sure to save it and replace it or the lid will not fit properly.
I like to use about 8-10 beans per bottle.
 Cut them in half length wide and 
scrape the goodie out with a knife. 
 Place the vanilla bean scrapings in the bottle.
Cut up the bean into pieces and put into the Vodka or Rum.
 Replace the strainer in the bottle and replace cap.
 
Now.... shake, shake, shake,  
shake, shake, shake
shake your Vodka!
Shake everyday for 1 month for a couple of minutes.
I shake once a week after that.
Store the Vodka on its side in a cool dark location.  This is so the the beans will have more surface area exposed to the beans.
In 6 months the Vanilla will be ready for use.

Now is where the Fun begins!
Most people will tell you to strain your vanilla.
I don't mind the little seeds and bits.  Get a coffee filter and strain the vanilla or not.

Find pretty bottles and fill.  
It makes wonderful gifts.